
After deciding the time was right to go solar, I figured we’d just call up a few reputable residential solar installers, get some proposals, and pick the best option. Of course it wasn’t that simple. What we soon realized–about halfway through our first contractor meeting–was that there were some key decisions to make at the outset and each option has pros and cons. I had no idea, for example, that the vast majority of residential solar installations in the U.S. are grid-tied systems rendered utterly useless in a blackout. Do we really want to invest a bunch of money in a solar system if we can’t even use it when we most need it? That seemed nuts. But going off grid and using batteries adds significant cost, negates the 30% Federal tax credit, and eliminates the potential value of any surplus power you generate. Plus here in New England you’d need to run a generator occasionally in the winter.
But it turns out there’s a third option: grid-tie with battery backup. These systems offer the convenience and financial advantages of grid-tie, but can also function as a self-sufficient backup power supply when the grid’s down. While it costs a bit more than a straight grid-tie system, you can keep the battery bank modest to reduce cost if you just use it to run a few key appliances and some lights rather than the entire household. And unlike a straight grid-tie system, you can keep generating photovoltaic power during the day when the grid is down. This was clearly the right option for us.
We really didn’t want to invest a lot in batteries at this point–battery technology seems like it’s poised to make some major breakthroughs in the next few years–but what if we just bought a minimal bank of quality flooded lead acid batteries? Enough to run the frig., the freezer, the water pump, and some lights for 24 hours or so. We went back to our contractors with our idea, but by that time it was late summer and most of them were booked through the end of the year. We’d miss being grandfathered under the current net metering rules, which were due to expire on January 1.
What if we got it done ourselves? I had some carpentry and electrical experience and wasn’t afraid to take on something new and challenging. Plus I really wanted to understand how solar electric systems work, and what better way than to design and build one? Obviously it was going to require a lot of study and careful planning, but I’d taken on challenging projects before and wasn’t going to let that deter me.
The Home Energy Audit
The planning process began with a simple question that a lot of Americans have never really had to think about: How much electricity does it take to run your house?
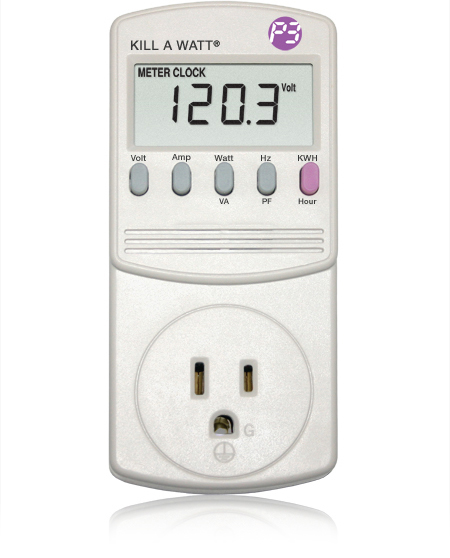
I listed all of the appliances and items that use electricity in our home, and created a table showing the volts, watts, amps, hours per day, and watt hours per day for each load. A great tool for this is a watt meter like the Kill a Watt–you just plug it in to the wall, then plug the appliance into the meter. It gives you immediate data in real time or you can leave it in place for a period of time to record power consumption.
It’s probably worth a quick science-class review on the terminology:
- Volts measure potential force (similar to water pressure, psi)
- Amps measure the flow of electrical current (similar to water flow, gpm)
- Watts (V x A) measures power
- Wh (Watt Hours) measures power over time (1 watt hour=the amount of power required to supply 1 watt continuously for 1 hour)
So it’s pretty straightforward: figure out how many watts your load consumes, then multiply that by the number of hours per day that the load runs–the result is the number of Wh/day used by the load.
Here’s what our results looked like:
| Load | V | A | W | Hours/Day | Wh/day |
|---|---|---|---|---|---|
| kitchen range | 240 | 22 | 5,000 | 1 | 5,000 |
| well pump | 240 | 7 | 1,680 | 2 | 3,360 |
| desktop computers (2) | 120 | 2.2 | 264 | 8 | 2,112 |
| lighting | 120 | 2.6 | 312 | 5 | 1,560 |
| toaster oven | 120 | 13.3 | 1,450 | 1 | 1,450 |
| dishwasher | 120 | 12 | 1,440 | 1 | 1,440 |
| clothes washer | 120 | 8.3 | 996 | 1 | 996 |
| cable modem and router | 120 | .16 | 19 | 24 | 456 |
| freezer | 120 | 1.3 | 100 | 3 | 300 |
| refrigerator | 120 | 1.3 | 100 | 3 | 300 |
| vacuum cleaner | 120 | 9.7 | 1,023 | .25 | 255 |
| notebook computer | 120 | .14 | 16.8 | 5 | 84 |
| hot water heater | 120 | 0.64 | 63 | 3 | 1 |
| Totals: | 12,183 | 16,754 |
As you can see, we use roughly 16.7kWh per day at our house (national average is 29). If you look at our actual utility bills, however, in reality it’s more like 13kWh–while the chart shows the kitchen range gobbling 5kWh alone each day, that would only really happen if we had all the burners on plus the oven for a solid hour, which is rarely the case. In addition to kWh/day, the other number to make note of is maximum peak demand, which is what your house would consume if all loads were drawing simultaneously–in our case 12.1kW. While in actual practice we’d probably never draw that much power, it’s a useful datapoint.
Critical Loads
In a grid-tie with battery backup system the battery bank isn’t necessarily sized to power the entire house, just a subset of critical loads like well pump, frig. and freezer, etc. So we need to separate out those loads to calculate how much power the battery bank would need to supply when the grid is down:
| Load | V | A | W | Hours/Day | Wh/day |
|---|---|---|---|---|---|
| well pump | 240 | 7 | 1,680 | 2 | 3,360 |
| living room and kitchen lighting | 120 | 1 | 120 | 5 | 600 |
| freezer | 120 | 1.3 | 100 | 3 | 300 |
| refrigerator | 120 | 1.3 | 100 | 3 | 300 |
| hot water heater | 120 | 0.64 | 63 | 3 | 189 |
| Totals: | 2,063 | 4,749 |
It turned out we could get by with about 4.7kWh/day with just the critical loads running. Now that we had some reasonably accurate numbers to quantify our power needs, it was time to look at equipment options and work up a budget.
Choosing the Gear
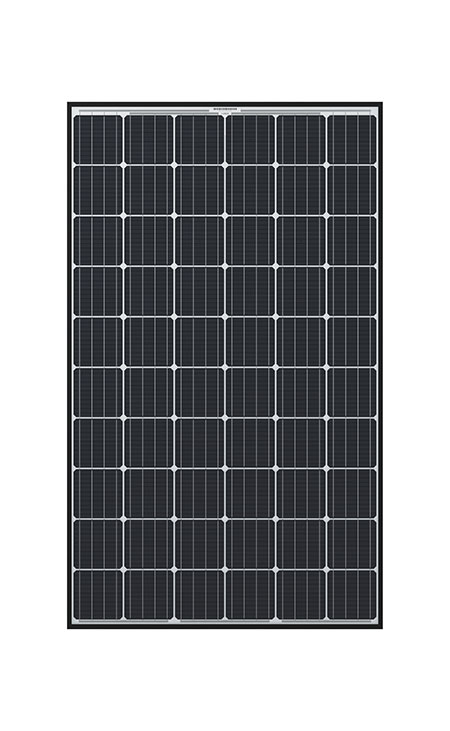
There was a lot of uncertainty around solar panel prices and availability last summer, especially with the proposed tariffs on imported panels. Installers were trying to stock up on extra panels in case there were upcoming shortages. We decided to fast-track our panel order, even though it’s better to design the system first. At first we wanted to buy American-made panels, but that turned out to be complicated for a number of reasons: several of the American manufacturers were in serious financial straits, which cast some doubt on the warranty protections. And other American and Canadian companies told me that they actually imported many of their panels. Because of the shipping expense, we ended up working with a supplier in our New England Region, AltE, which turned out to be a very solid outfit. We didn’t necessarily want to pay a premium for the most powerful panels available (like computer hardware, solar panels keep getting more powerful with each passing year), but we wanted at least a 300 watt panel (the highest-end panels at the time were 350-360W). We also wanted standard-size 60-cell panels so we could fit two rows on our roof, and many of the most powerful panels were 72-cell and too long. It turned out AltE had just received a shipment of 305W panels made by Hanwah Q Cells, a reputable company created by the marriage of Q Cells, a German company, and the Korean Hanwah. The panels are engineered and tested in Germany but the actual production happens in Korea. We ended up buying 21 Q.Peak G4.1 panels ($211/each, or 69 cents per watt), which turned out to be perfectly sized for our application (one spare panel). A palette of panels for about 5 grand…a fraction of what that cost ten years ago, and much more powerful.
Inverter
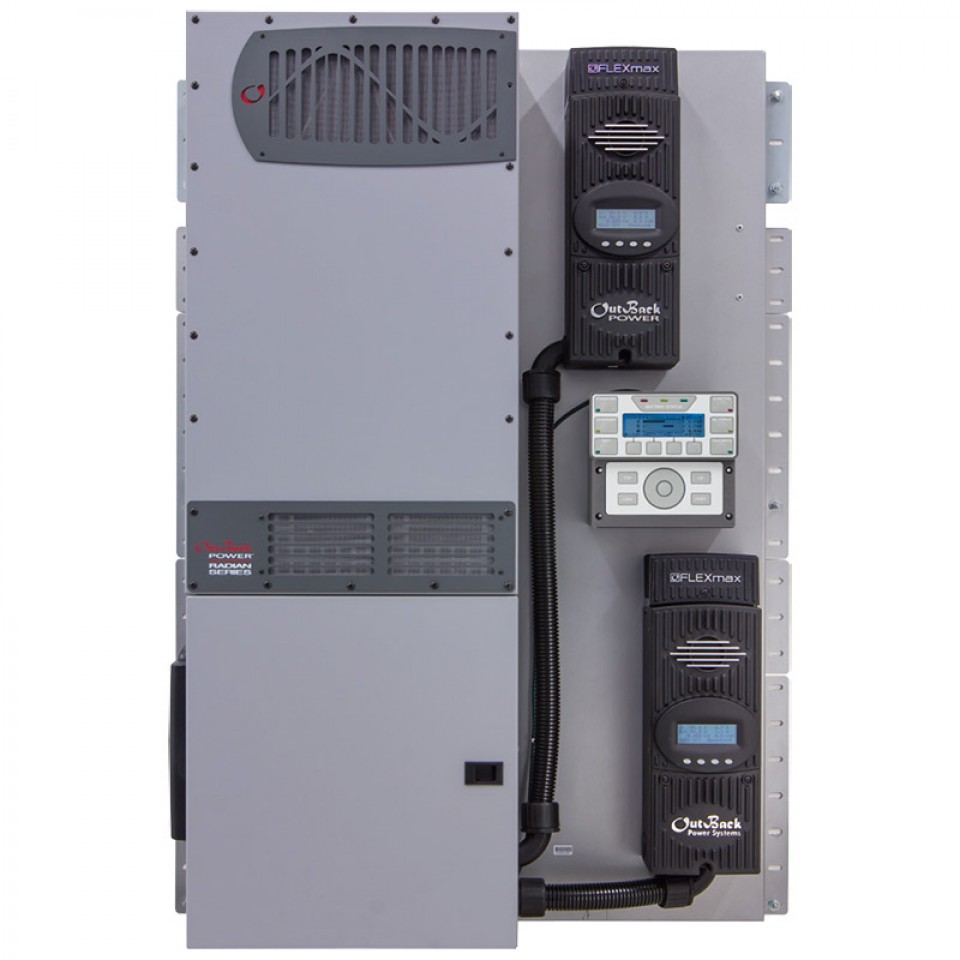
Choosing the inverter came down to two similar competing products: Outback Power’s Radian 8048A and Schneider Electric Conext XW+. We wanted something with a high-enough wattage rating to stay well below its ceiling while powering the backup loads plus be able to invert as much power as the PV array generates at solar noon. I had a conversation with sales and with tech. support at both outfits, reviewed the online literature carefully, talked to installers, asked retailers their opinion, and scoured Google for reviews and information. The both seem like solid products, and a lot of it comes down to personal preference. A couple of small factors tipped the decision for us: a lot reputable installers in our area were big on Outback, they’re an American company (Schneider is actually French), and in a conversation with a tech. at Schneider I learned that the manufacturing facility for the inverters had recently been moved to the Phillipines, and there was some delay in availability, which made me wonder if there were some manufacturing kinks to be worked out. The Outback unit is made overseas too, but the product we had in mind is assembled and tested in Washington state.
To make sure all the components of the system integrate well and can be easily managed, and to safe some time on wiring, we ended up buying Outback’s FLEXPower 8048A system, which bundles the inverter with 2 FM80 charge controllers, a computerized system management console, and a well-designed wiring panel with circuit breakers and battery bank monitor. The whole shebang is securely fastened to a beefy metal panel that mounts on a wall.
Battery Bank
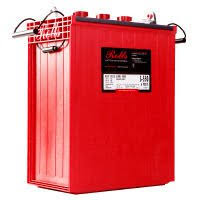
Our thinking on this was pretty simple: battery technology is improving fast and some revolutionary developments seem imminent: let’s invest in a modest interim solution that will buy us 5-10 years to see what emerges in the battery world. A number of local installers were still using flooded lead acid batteries, an acquaintance with an off-grid system said he got a decade out of his, and I knew enough about batteries to know I could handle monitoring and maintaining a flooded battery bank. But batteries are important, and we didn’t intend to just go to Walmart and buy the cheapest deep-cycle battery on the shelf. Outback tech. told me 350 amp hours were the minimum recommended for our inverter. We ended up with 428 amp hours using 6 Rolls-Surette S-550 batteries for just under $3K. I hadn’t heard of Rolls batteries much before, but learned they make a high-end product built to last–big supplier for powering things like forklifts. Obviously with batteries it depends how you treat them, but my hope is with careful monitoring and gentle use they’ll last 7-10 years, or at least until we invest in a more powerful bank.
So just how long will this bank power our backup loads? If we need 4.7kWh/day, how many kWh are stored in the batteries? Considering that we only really want to use the top half of the battery bank’s storage capacity to avoid shortening the bank’s life, that’s 214 amp hours at 48 volts. To convert that to kWh, just multiply the two numbers then divide by a thousand : 10.3kWh. Factoring inefficiencies in the system, we should be able to run the house for approximately 2 days. That seemed like a good compromise, especially as power outages here are rare and typically brief (although that could easily change someday).
Wiring and Other Supplies
It was surprising how much wiring and other electrical components add to the bill. Copper is expensive! You’ll definitely want to design your system fully before buying any wire, as it’s crucial to size the wire correctly. This isn’t just a matter of safety and code conformity (although it is that), it’s also a matter of minimizing voltage drop, which in a DC system can be significant if you’re not careful. I used the National Electric Code extensively for this, plus some online voltage drop calculators.
Designing the System
We knew we wanted the panels on the house roof, with a few extras on the roof of a nearby toolshed–both roofs were at a 45 degree angle and oriented due south. Locating the inverter and battery bank was a little less clear–at first we wanted to put it in our utility room because that’s where the electrical service entrance is (no basement here), but it’s already crammed full, and we weren’t wild about putting a potentially noisy/hot inverter in the house–not to mention a big bank of flooded lead acid batteries. The toolshed–a 12 x 24 wood-framed outbuilding just 30 feet away from the utility entrance on the house–seemed like a much better choice. We heard conflicting things about putting flooded batteries in an unheated space, but after several discussions with battery company techs. and users we decided it would be fine so long as the batteries were not at a low state of charge during a cold snap (it does get below zero on occasion here in Maine).
When we built the house I installed electrical conduit in the wall running from the attic to the utility room, thinking it would come in handy one day, so running wire down from the attic was pretty easy. To connect the utility room to the toolshed would require installing about 40 feet of underground conduit–not fun, but doable.
After poring over manuals, factory wiring diagrams, and the National Electric Code, I finally came up with a wiring diagram:
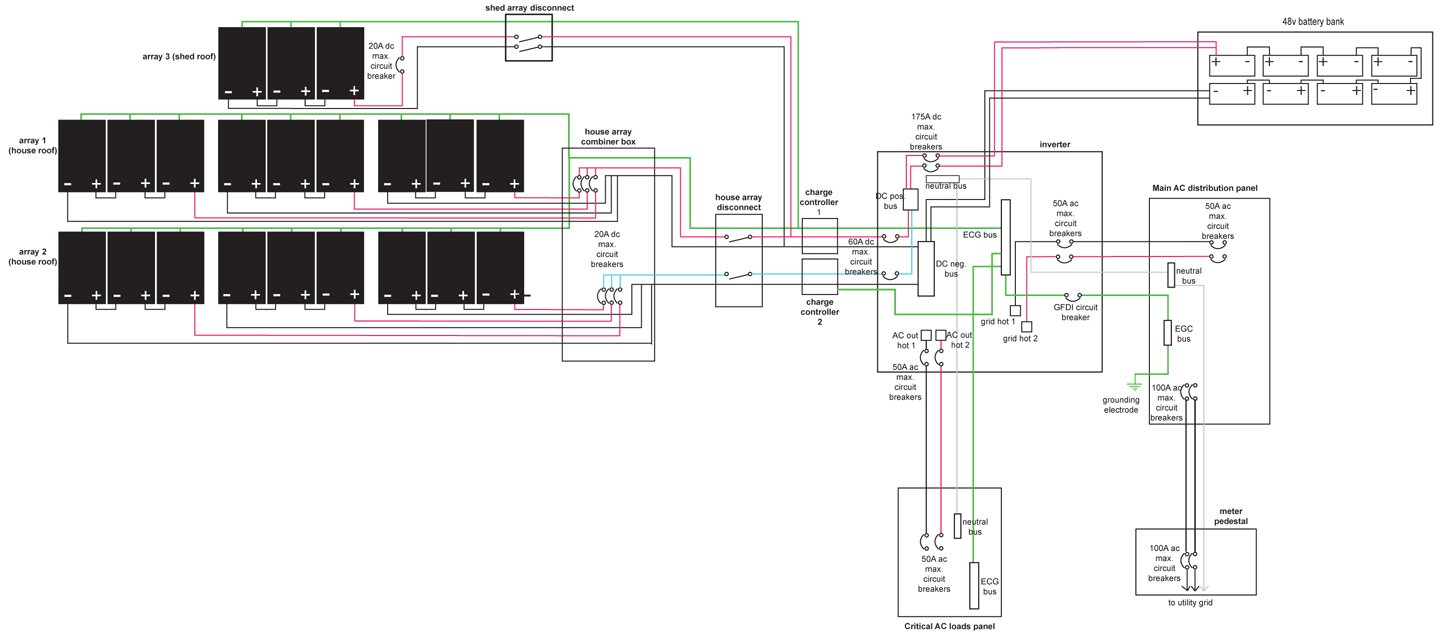
I showed it to my local town code enforcement officer to make sure everything was kosher with him. From his reaction I gathered he wasn’t used to getting that level of detail from permit applicants–and he said everything looked fine. Phew!
One More Detail
Before finalizing everything and proceeding, I made sure to talk with my power company (Central Maine Power) about the grid-tie. The people I dealt with were very easygoing and agreeable–all I had to do was pay $50 and file an application for an interconnection and net metering agreement. The whole process took roughly 6 weeks, and once the power company ran a test, signed the paperwork, and installed new dual meters, we were good to go online whenever we were ready.
Now it was time to get to work! Next up: installation.